Welcome! You’ll find here guides to help you choose and pick the right tools for your DIY project while browsing your tool library inventory.
How to navigate the page? Click to jump to the guide or scroll down.
Choosing power drills and drivers
Choosing the correct drill bit
Choosing the correct screw bit
These guides have been put together by ETL volunteers for tool library members in Edinburgh, Scotland and beyond.
We’re keen to add more and make it work best for you, so feedback and suggestions are much welcome!

Choosing power drills and drivers
Drills are mainly used to bore holes, but they are also commonly used for driving screws in and out.
There’s also a specialised drill-like tool called an impact driver that is purpose-built for driving screws.
You can also get wire brushes, sanding/polishing discs, and mixing paddles (for plaster etc) to be used with drills. Drills also come in handy for other jobs – see “Other uses for drills” at the end.
When you are choosing which drill to borrow, think about:
- what material you’re drilling in to,
- how big the holes need to be,
- and how many of them you need to drill.
Then read on…
Cordless drill
Choose a cordless drill unless there’s a specific reason to use a different type (see later). A cordless drill is powered by a battery, which is obviously convenient, but if you’re doing heavy-duty drilling, the battery may go flat inconveniently quickly.
If you’re drilling holes up to about 10mm in soft materials like wood and plastics, or driving screws, a cordless drill will be good. The larger the holes or screws, the shorter the battery life. Drilling into metal or masonry, or drilling larger holes with a flat bit or hole saw, will be hard on the battery, but it may be OK if you are only doing one or two.
Cordless drills usually come with two batteries and a charger, so that one battery can be charging while you’re using the other. However, if you do heavy work the battery may not charge fully before the one in the drill has run down.
Mains-powered (corded) drill (click to reveal)
A mains-powered drill can do everything that a cordless drill can do, but more of it. There’s no battery to run down, so you can drill as many holes as you like, as big as you like. Similarly you can screw all day.
The downside is that there’s a cord that can get in the way, and you have to arrange mains power where you need it.
Mains drills can spin much faster than cordless drills, so for wire-brushing, sanding etc. they are usually the ones to choose.
A mains drill is not ideal for driving screws. If the screw becomes immovable, the drill can suddenly turn very hard the other way, with nasty effects on your wrist. Most cordless drills have a clutch to stop this happening.
Hammer drill
Practically all mains drills, and some cordless drills, have a hammer option, selected using a switch. This greatly speeds up drilling into masonry. If you are drilling lots of holes in masonry, use a mains hammer drill. The hammer option is very loud: ear protection is essential.
SDS drills
For really heavy-duty work in concrete, stone, brick, and steel, you will need an SDS drill. These have a different kind of chuck (the rotating socket that the drill bit fits into) that allows a much more effective hammering action. Drill bits for ordinary chucks and for SDS chucks are not interchangeable.
Impact Driver
These look rather like a lightweight cordless drill but are for driving screws only. They have a special chuck that takes standard screwdriver bits with hexagonal shanks. They have a kind of rotational hammer action that kicks in when the screw becomes too hard to drive in the normal way. They are excellent for driving all screws, but come into their own for large screws and for getting out old screws. When the hammer action is operating, they are very loud – use ear protection!
Other uses for drills
Drills can turn things other than drill bits and screwdriver bits.
You can get mixing paddles designed to be used with a mains drill, for mixing plaster and similar materials in a bucket.
Wire brushes and sanding/polishing discs are available for use with drills.
A slotted dowel with a piece of sandpaper in the slot can be spun in a drill and used to sand the inside of drilled holes (for example to enlarge them slightly).
Clamp two electrical wires together in the chuck of a drill, hold the other ends together, and run the drill slowly. In no time at all, you’ll have a lovely tidy twisted pair of wires!
Choosing the correct drill bit

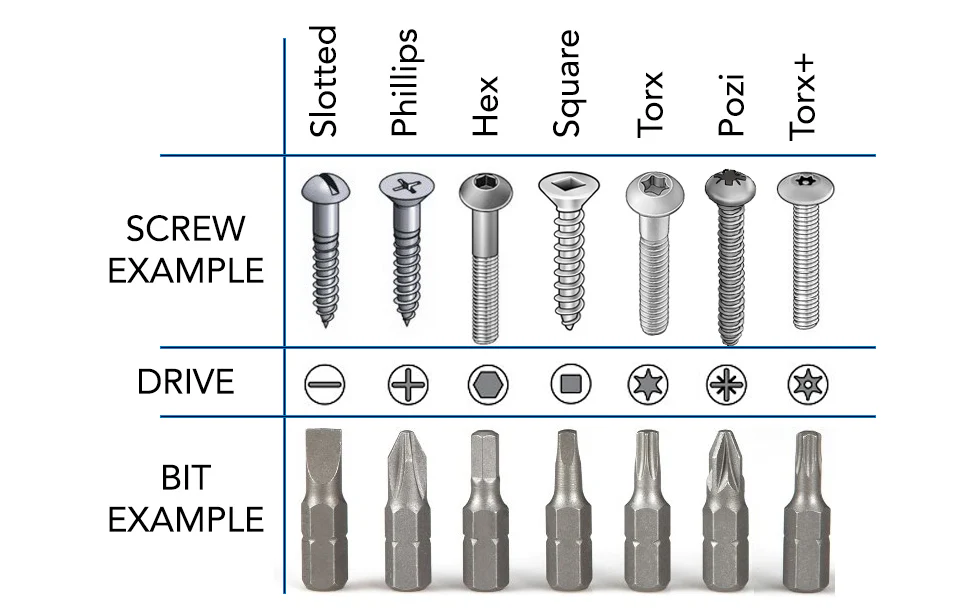
Choosing the correct screw bit
Buying sandpaper
Sandpaper is used for shaping and smoothing many materials, but it’s mainly useful on wood and plastics.
Lightly sanding surfaces between coats of paint or varnish will improve the final finish. Sandpaper can also be used to slightly roughen (“key”) the surface of old paint to provide a good base for repainting. It can also be used for removing paint and other finishes (this is laborious and not always safe – see later).
It’s often a good idea to use sandpaper to slightly roughen (‘key’) surfaces before you glue them.
The rough and the smooth
All sandpaper has a grit number. This number tells you how coarse or fine the sandpaper is. The bigger the grit number, the finer the sandpaper. As a guide, 60 grit sandpaper is very coarse, and 240 grit is as fine as you might ever want for woodwork. For doing car bodywork, you can get sandpaper up to 1500 grit. (10,000 grit paper is available if you really want to be the envy of your friends!)
The coarser the sandpaper, the faster it removes material, but the deeper the scratches it leaves. If you’re sanding down wood for painting or varnishing, use coarse paper until the surface is no longer improving, then switch to medium paper, and finally use fine paper. If you go too fine too early, the job will take a lot longer. A common sequence of grit numbers is 80-120-180, but some assorted packs of coarse-medium-fine paper will have different grit numbers.
Wet or dry?
Ordinary sandpaper is used dry. You can also get “wet and dry” sandpaper, which can be good for sanding plastics or paint by hand. It’s easily identified by its dark grey colour. You use it with water, which helps to keep the sandpaper from clogging with dust. Have a bowl of water next to you, and frequently dip the paper in the water. Wood is always sanded dry.
Sizes
Sandpaper comes either as sheets or in a roll. It is easy to crease and tear it into the size that you want.
Don’t worry what it is made of
Sandpaper usually specifies which abrasive it uses: aluminium oxide, silicon carbide, etc. Don’t worry about this. You typically won’t have a choice anyway.
Sanding sponges
You might find sanding sponges in the shops. These are firm sponges coated with abrasive, often used for rubbing down paint. When the abrasive clogs, you can rinse them in water. They are useful for sanding odd shapes.
You might use instead
Steel wool (wire wool). This can be good for intricate shapes. It comes in different grades of coarseness: 4, 3, 2, 1, 0, 00, 000, and 0000. Just to be confusing, the grading works in the opposite way to sandpaper: the larger the number, the coarser it is.
Don’t use steel wool if you are planning to finish with a paint or varnish that is water-based (ie most of them). It will leave behind minute particles of iron which will rust and leave brown streaks.
Using sandpaper
By hand
If you’re sanding a flat surface, you’re much better off wrapping the paper round a block of wood instead of holding the sandpaper in your hands. Using such a sanding block gives you a more even pressure, it makes the paper last longer, and it is more comfortable. Ideally the block should be slightly soft. You can buy cork sanding blocks, or you can improvise by, for example, wrapping a few layers of fabric around a block of wood.
For other shapes of surfaces, you can devise your own custom sanding “blocks” (such as a piece of dowel with the paper wrapped around it).
Make your piece of paper the right size to suit your sanding block. With most sandpaper, if you fold it over and crease it, it will tear easily along the crease.
In a power sander
Some power sanders specify an exact size and shape of sheet, which might be self-adhesive or held onto the sander by a velcro-like material. Some other sanders hold the paper in clips; you can use any paper of the right size in these (but thin papers may tear). Belt sanders use a continuous belt – the manual will specify the length and width of the belt. Some belts have arrows on them to indicate which direction they should move in (and hence which way round you put it on the sander).
Sanding wood
As described earlier, if you are aiming for a smooth finish for painting/oiling etc, start with coarse paper and proceed to medium and then fine paper. Typically, you may start with 80 grit, and 180 or 240 grit is as fine as you’re likely to need to go.
Sand in the direction of the grain, not across it.
Sanding other materials
You can sand all sorts of materials. For example, wet sanding will vastly improve the cut edges of plastics (eg perspex). You’ll need to go to extremely fine grits (Halfords sell paper up to 1500 grit for car bodywork repairs). Create a final polish using T-Cut paste (also from Halfords).
Paint can be terrible for clogging sandpaper. Sanding it wet is much better, but you can only do this if you aren’t exposing bare wood.
Safety
You should wear a dust mask. Paint in old (pre-1980’s) houses may contain lead. Always sand this paint wet, or use paint stripper if you are removing it completely.
Buying jigsaw blades
The key things that you need to think of when you’re buying jigsaw blades are:
- What are you cutting?
- How thick is the material?
- How good a finish do you need?
- Uppies and downies. (I’ll explain!)
- Are you cutting tight curves?
- What sort of jigsaw do you have?
What are you cutting?
The materials that you’re likely to be cutting are wood, plastics, metal, and laminates (eg kitchen worktop). Packets of blades normally say what material they are intended for.
The key division is between blades for cutting metal and the rest. A metal-cutting blade is essential if you’re cutting metal, and won’t work on other materials. Some metal blades are generic, and others are specific to steel, aluminium, non-ferrous metals etc.
Non-metal-cutting blades are more multi-purpose: most are for wood, but you can get away with using them on wood, plastics, or laminates. But for high-quality cuts, specific laminate or plastic blades are best.
How thick is the material?
If you’re cutting material that’s so thick that the length of the blade is an issue, you should consider other options such as a hand saw, a circular saw, a chop saw, or (in the workshop) the bandsaw. Jigsaw blades are quite flexible, which means that in thick material, the bottom of the cut may not follow the same line as the top of the cut.
But if you insist…the blade needs to be long enough to pass right through the material when the blade is at its highest position. This means that you want the toothed section of the blade to be at least 25 mm longer than the thickness of the material. Unfortunately, blade lengths are often given as the total length of the blade, including the part that fits into the jigsaw. The toothed section is about 25 mm shorter than this.
How good a finish do you need?
Generally speaking, jigsaw blades either cut quickly, or they cut cleanly, but they generally don’t do both (and some cheap ones may do neither).
Some blades have useful names like “fast wood” and “clean wood”. Failing that, the tooth spacing (“tooth pitch”) will give you an idea. Tooth pitches vary from roughly 4mm to 1.5mm: the finer the pitch, the cleaner and slower the cut.
Tooth pitch is also important if you are cutting thin sheet materials: the tooth pitch should be less than the thickness of the material (preferably no more than half the thickness).
There’s another aspect of clean cutting. Wood tends to splinter as the blade leaves it (and laminate tends to chip), which brings us to…
Uppies and downies
Some blades are designed to cut on the upstroke, and others on the downstroke. You can tell by seeing which way the teeth point. With an up-cutting blade, you’ll tend to get splintering on the top side of the workpiece, and with a down-cutting blade, it’ll happen on the lower side.
Up-cutting blades are more common. They are easier to use than down-cutting blades, because as the blade moves upwards doing the cut, it pulls the jigsaw down snugly against the workpiece. On the other hand, a down-cutting blade tends to push the jigsaw up from the surface. If you aren’t careful, the jigsaw can leap about alarmingly.
The advantage of a down-cutting blade for wood is that it’s often easiest to mark the line of the cut on what will be the visible surface of the finished article, and this is the side where you don’t want splintering.
Some blades have symmetrical teeth and cut either way.
Are you cutting tight curves?
All jigsaw blades can cut curves, but there are blades that are less deep (from the teeth to the back of the blade) than usual, which are good if you need to cut tight curves.
What sort of jigsaw do you have?
The part of the blade that fits into the jigsaw (the shank) comes in two varieties. Much the most common is the T-shank (sometimes incorrectly called the bayonet shank by Screwfix). The T-shank has two bits sticking out of its sides. You don’t normally need a tool to change a T-shank blade.
Some older jigsaws use U-shank blades, They have straight sides and a little semicircular cut taken out of the end. You often need a tool (eg an Allen key) to change a U-shank blade.
You need to get the right kind of shank for your jigsaw. T-shanks and U-shanks are not interchangeable. Some blades describe themselves as “universal” and fit either kind of jigsaw